

This lesson is made with PSPX9
But is good with other versions.
© by SvC-Design
Materialen Download :
Here
******************************************************************
Materials:
dino's.png
egg.png
kleurstaaltje.jpg
Leny-fantasy.png
Leny-tekst.png
puppy.png
******************************************************************
Plugin:
Effects - plugin - Mehdi - Wavy lab 1.1.
Effects - plugin -Filter Unlimited 2.0. - Scribe – Donuts
Effects - plugin - MuRa's Meister - Perspective tiling
Effects -plugin - Graphics Plus - Cross Shadow
******************************************************************
color palette
:

******************************************************************
methode
When using other tubes and colors, the mixing mode and / or layer coverage may differ
******************************************************************
General Preparations:
First install your filters for your PSP!
Masks: Save to your mask folder in PSP, unless noted otherwise
Texture & Pattern: Save to your Texture Folder in PSP
Selections: Save to your folder Selections in PSP
Open your tubes in PSP
******************************************************************
We will start - Have fun!
Remember to save your work on a regular basis
******************************************************************
1.
Foreground color e0e589
Background color 8d1f1e
2.
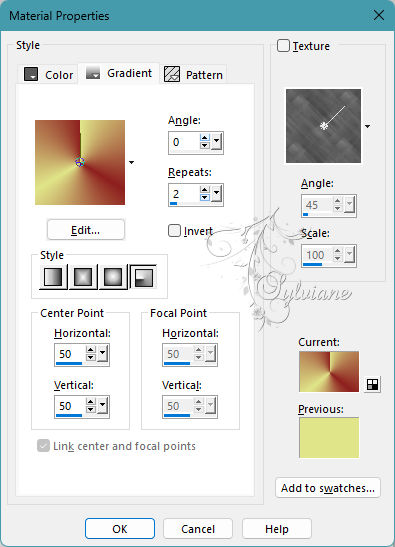
Set the foreground to gradient Radial
Settings as on the print.
3.
Take a new image of 900-600 pixels
4.
Fill the image with the gradient.
5.
Adjust - Gaussian Blur - Range 30
6.
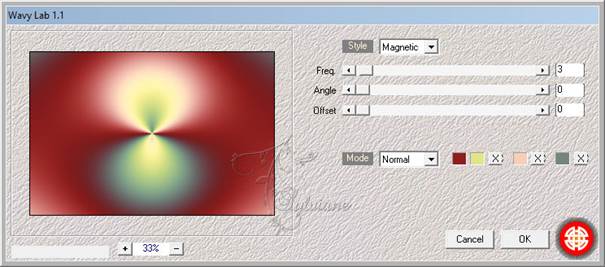
Effects - plugin - Mehdi - Wavy lab 1.1.
Settings as on the print.
7.
Image - Mirror - Vertical Mirror
8.
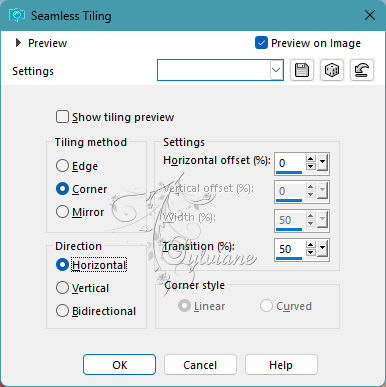
Effects - Image Effects - Seamless Tiling
9.
Adjust - Blur - Radial Blur
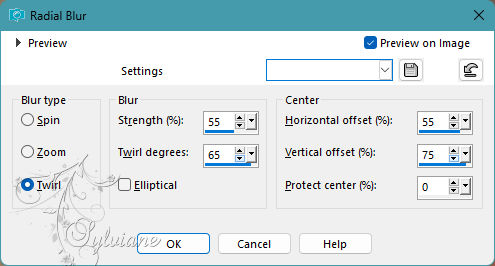
10.
Layers - Duplicate
11.
Effects - plugin -Filter Unlimited 2.0. - Scribe – Donuts
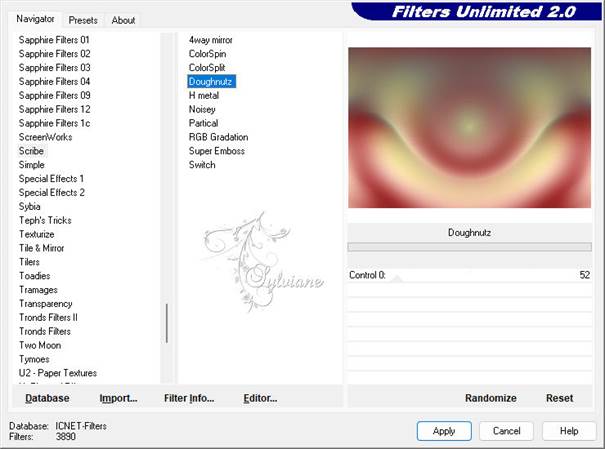
12.
Layers - duplicate
13.
Image - Mirror - Vertical Mirror
14.
Set the opacity to 50
15.
Layers - merge - merge down
16.
Layers - duplicate
17.
Set the Blend Mode to Hard Light
18.
Activate Raster 1
19.
Layers - Arrange - Bring to Front
20.
Effects - plugin - MuRa's Meister - Perspective tiling
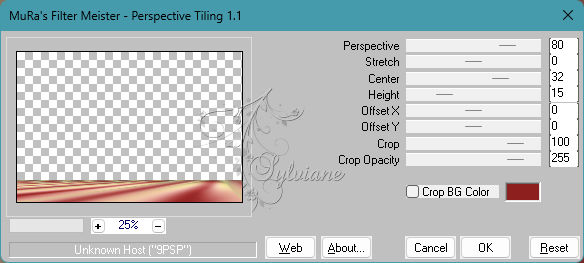
21.
Effects -plugin - Graphics Plus - Cross Shadow
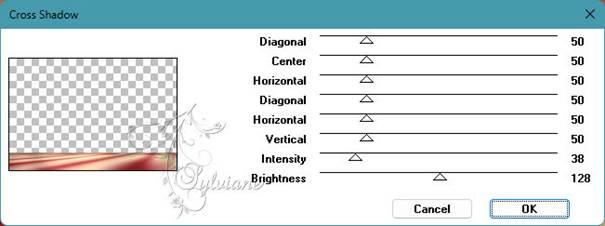
22.
Effects - Edge Effects - Enhance
23
Set the Blend Mode to Darker
24.
Tube egg
Edit - Copy
Back to the image
Edit - Paste as new layer on your image.
25.
The tube looks good right away
26.
Set the layer opacity to 58
27.
Tube Leny fantasy
Edit - Copy
Back to the image
Edit - Paste as new layer on your image.
28.
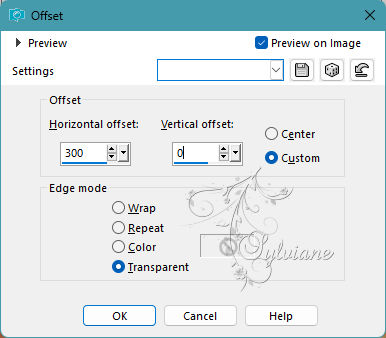
Effects - Image Effects – Offset
29.
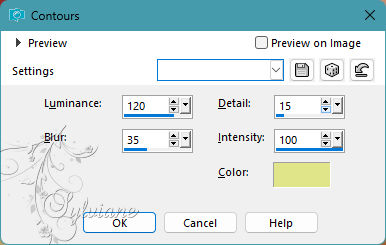
Effects - Artistic Effects - contours - color:#E0e589
30.
Layers - Duplicate
31.
Image - Mirror - Horizontal Mirror
32.
Pull it up slightly
33.
Set the opacity to 54
34.
In the layer palette, make the layer below this Copy your working layer.
35.
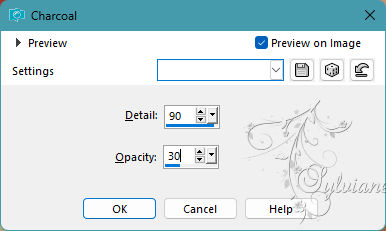
Effects - Art Effects – Charcoal
36.
Layer opacity at 84
37.
Tube puppy
Edit - Copy
Back to the image
Edit - Paste as new layer on your image.
38.
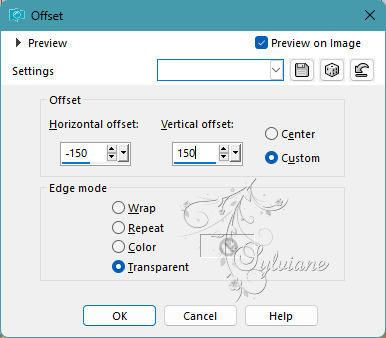
Effects - Image Effects – Offset
39.
Set the opacity to 60
40.
Tube Leny text
Place this at the top right.
41.
Tube dinosaurs
Edit - Copy
Back to the image
Edit - Paste as new layer on your image.
42.
Place it on the floor at the bottom.
43.
Layers - Merge - Merge group
44.
Image – Add Borders –symmetric - 1 Pixel – color:# 8d1f1e
Image – Add Borders –symmetric - 4 pixels – color:# e0e589
Image – Add Borders –symmetric - 1 Pixel – color:# 8d1f1e
Image – Add Borders –symmetric - 10 pixels – color: white
Image – Add Borders –symmetric - 1 Pixel – color:# 8d1f1e
Image – Add Borders –symmetric - 4 pixels – color:# e0e589
Image – Add Borders –symmetric - 1 Pixel - color:#8d1f1e
45.
Selections - Select all
Image – Add Borders –symmetric - 40 pixels – color: white
46.
Effects - 3D Effects - Drop Shadow
0/0/60/30- Color 8d1f1e
47.
Selections - Select none.
48.
Image – Add Borders –symmetric - 1 Pixel – color:# 8d1f1e
Image – Add Borders –symmetric - 4 pixels – color:# e0e589
Image – Add Borders –symmetric - 1 Pixel - color:#8d1f1e
49.
Place your name or watermark on the image
Image - Resize 900 pixel width.
Save as jpg.
Back
Copyright Translation 2023 by SvC-Design